

How To Fade In Logic Pro X
How To Fade In Logic Pro X
A fade is a gradual increase or subtract in the volume of an audio signal. Fades help to create shine transitions betwixt sections of a limerick or between individual elements of a track. Logic Pro 10 offers a variety of unlike ways to fade in or fade out audio and MIDI regions in the workspace. In this guide, I'll exist revealing each technique and helping y'all find which method is best for you.
- | Fade Tool Method
- | Book Automation Method
- | Region Inspector Method
- | How To Crossfade
Without further ado, let's dive in!
| Fade Tool Method
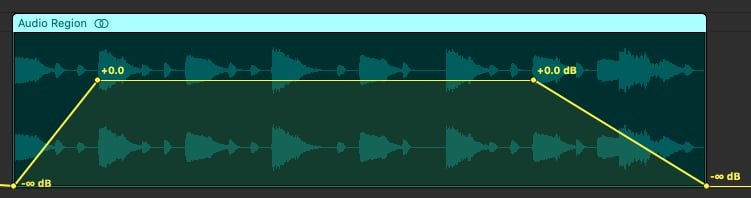
Using the fade tool on a loop, sample, recording or complete track is the most efficient way to create a fade in or fade out. Currently, the fade tool tin merely be used with audio regions merely creating a fade using this method can be quickly achieved in just a few seconds.
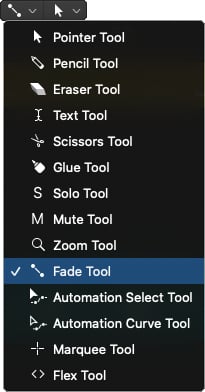
Footstep 1: Select Fade Tool
Click on the Left-Click Tool drib-down bill of fare and select the Fade Tool.
Step two: Identify Cursor At Get-go/End Of Audio Region
Place your cursor at the beginning or the end of your audio region, depending on where you would like to create a fade.

Pace 3: Create Fade
Lastly, click and elevate your mouse towards the center of your sound region to create a fade. Yous tin can conform the curve of a fade by clicking the fade line and dragging left or correct.

| Volume Automation Method
Automating volume makes information technology possible to create fades for both audio and MIDI regions. Y'all can also use this method to create fades for other parameters such equally a filter cutoff, left or correct panning, low EQ etc.
Step 1: Show Automation
Reveal automation in your Logic session by pressing'A' on your keyboard or by toggling the icon in the taskbar.
![]()
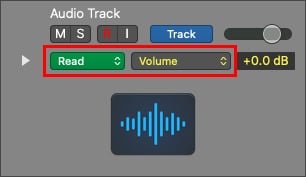
Step two: Select Volume Automation Parameter
On your audio runway, selectRead from the Automation Fashion popular-upward menu and choose Volumefrom the Automation Parameter menu.
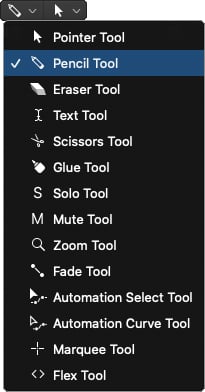
Stride three: Select Pencil Tool
Click on the Left-Click Tool drop-down menu and select the Pencil Tool.
Step 4: Draw Volume Automation
Lastly, pencil in 2 automation points that shape a fade in or fade out. You can reposition each automation point by selecting the Arrow Tool then clicking and dragging each yellow dot to create your desired fade. Utilise the Automation Curve Tool to curve the automation between ii points.
| Region Inspector Method
Creating a fade using Logic's Region Inspector is an incredibly fast fashion to fade an sound region. It is perfect for creating basic fade ins or fade outs while also offering the ability to quickly adapt a fade's curve.
Footstep 1: Prove Inspector
Reveal the Inspector window by selecting the icon in the taskbar or by pressing 'I' on your keyboard. Make sure you take selected the audio region you would like to fade.

Step 2: Click 'More'
Select'More' to reveal more Inspector parameters.
Step 3: Create Fade
Create a fade by clicking to the correct of the Fade In/Fade Out heading and dragging up. Alternatively, you tin can double-click and type in the fade amount.
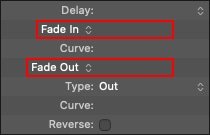
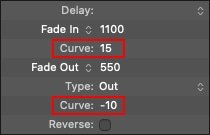
Step four: Bend Fade
You lot tin accommodate the curve of your fade in or fade out by clicking to the correct of the Bend heading and dragging up and down.
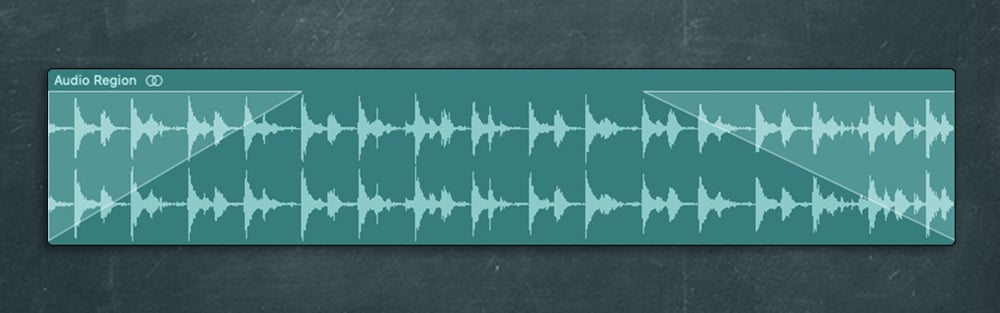
| How To Crossfade
Crossfading allows you to fade between 2 adjacent audio regions. It can be utilized to create a smooth transition between unlike audio segments.
Step 1: Connect Two Audio Regions
Identify two audio regions directly next to each other on the grid. Crossfading works with either a duplicate of a single audio region or two completely unique audio regions.

Step 2: Select Fade Tool
Click on the Left-Click Tool drop-down menu and select the Fade Tool.
Footstep 3: Create Crossfade
Place your cursor on the line where the ii audio regions connect. Click and drag left or correct until a crossfade appears between your two regions.
If you take accidentally created a fade on just ane of the sound regions, but elevate towards the connected region to create a crossfade.

Related Posts:
How To Update Logic Pro
How Much is Logic Pro X?
Top 10 Artists That Use Logic Pro In 2022
Desire To Know More than?
Here at Live Aspects, we take dozens of useful lessons and tutorials created to heighten your music production skills and assistance speed up the learning process. You tin can access our huge range of music theory lessons and production tips and tricks here.
![]()
Source: https://liveaspects.com/fade-in-logic-pro/
0 Response to "How To Fade In Logic Pro X"
Post a Comment